TallyGo Help Center
Getting Started
1. For Android download and install the TallyGo Asset Tracker App from Google Play.

1. For iOS download and install the TallyGo Asset Tracker App from the Apple App Store.

- If you don't already have a TallyGo account select No
- Otherwise continue here

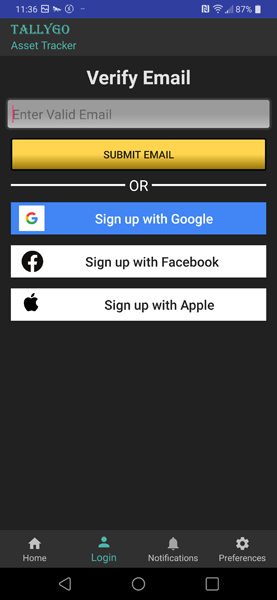
- Create account using your Email
- Enter a Valid email then tap SUBMIT EMAIL
- OR Sign up using Google/Facebook/Apple login and skip the rest (some people find this method easier as it bypasses password generation)
- Enter the 6 digit code sent to your email (may be in your spam folder)
- Tap SUBMIT CONFIRMATION CODE

- Tap CONTINUE

- Setup your password

- If you already have a TallyGo account then select Yes

- Login using your email address or Login using Google/Facebook/Apple (must be the same social media account you previously logged in with)

- After a successful login, all your previously activated beacons will be downloaded to your Inventory.

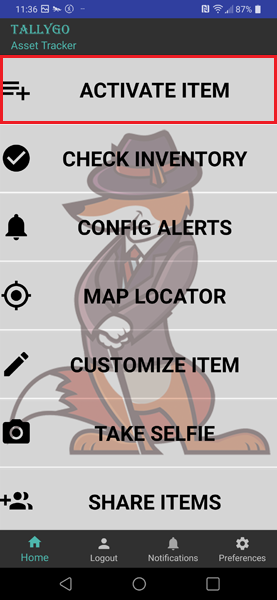
1. Select "ACTIVATE ITEM" from the home screen
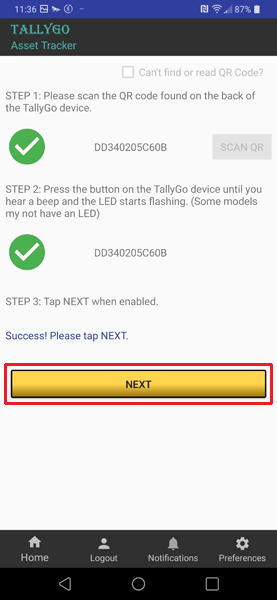
- Scan QR code found on the back of TallyGo device


- Long press the button on the TallyGo device till you hear a beep and the LED starts flashing
- Tap NEXT when enabled
2. Customize Item
- Configure options and alerts for this beacon
- If this is an item that should never be separated from your phone such as your Keys or Purse select Stay Connected
- Select the appropriate alerts (these can be modified at any time)
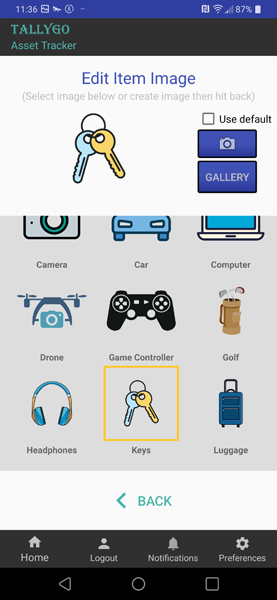
- Edit Item Image (optional) (tap the arrow icon)

- Select from the image list or create your own using your phone camera
- Select Back when done
- Edit Title (optional)
- Edit Description (optional)
- Hit Save to save your changes

Videos
 |
Activate Your Item in Under a Minute |
| Ring Your TallyGo Beacon | |
 |
Create and Edit a Custom List |
 |
Replace Your Battery (you're probably doing it wrong) |
 |
Debug and Troubleshoot your TallyGo device |
Android
1. Go to "Settings"

2. Go to "Apps"

3. Go to "TallyGo"

- Make sure Notifications are allowed
- Make sure Remove permissions if app is unused is toggled OFF

4. While still in the App Info screen, Go to "Permissions"

5. Go to "Location"

- Make sure Allow all the time is selected
- Make sure Use precise location is toggled ON (if available)
- Go back to previous screen when done

6. Go to "Battery"

- Make sure Unresticted is selected
- Don't worry about battery usage. TallyGo is already extremely optimized while in the background.
- Go back to previous screen when done

7. Make sure Adaptive Battery is toggled off and TallyGo is excluded from memory free up
- Go to Settings → Battery and device care (May be in another location on your phone model)

- Go to Battery
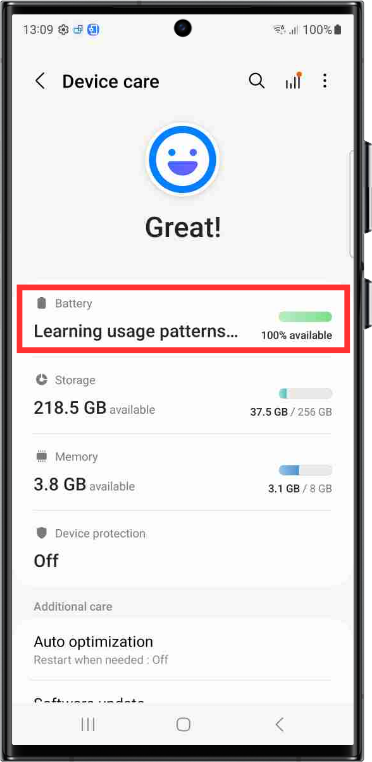
- Go to More battery settings

- Make sure Adaptive battery is toggled off

- Go back to Device care and select Memory

- Go to Excluded apps

- Select the plus button

- Select TallyGo then select Add

- TallyGo is now excluded from memory optimization

8. Now launch TallyGo

- Go to Preferences
- Scroll down to Critical Permissions
- If everything is setup correctly, then all the permissions should be checked

1. Go to "Settings"

2. Go to "Apps"

3. Go to "TallyGo"

- Make sure Notifications are enabled

- Scroll down till you see Pause app activity if unused are allowed
- Make sure Pause app activity if unused is toggled OFF

4. While still in the App Info screen, Go to "Permissions"

5. Make sure "Notifications" are allowed. Then go to "Location"

- Make sure Allow all the time is selected
- Make sure Use precise location is toggled ON (if available)
- Go back to previous screen when done

6. Go to "App battery usage"

6b. If using Android 15 or greater you may see this screen.
- Make sure Allow background usage is enabled
- Then click on the label Allow background usage to advance to the next screen

- Make sure Unresticted is selected
- Don't worry about battery usage. TallyGo is already extremely optimized while in the background.
- Go back to previous screen when done

7. Now launch TallyGo

- Go to Preferences
- Scroll down to Critical Permissions
- If everything is setup correctly, then all the permissions should be checked

Apple
1. Go to "Settings"

2. Make sure "Bluetooth" is On

3. Scroll down and select "Privacy"

- Make sure Location Services is On
- Go back to Settings

4. Scroll down and select "TallyGo"

5. Go to "Location"

- Make sure Always is selected
- Make sure Precise Location is toggled ON
- Go back to previous screen when done

- Make sure Bluetooth is toggled ON
- Make sure Camera is toggled ON
- Make sure Notifications Banners, Sounds, Badges is enabled
- Make sure Background App Refresh is toggled ON
- Make sure Cellular Data is toggled ON

- Important! After about 3 days you may get a notice like the following.
- Be sure to select Always Allow for reliable service in the background.

FAQ
1. Select "CHECK INVENTORY" from the home screen.
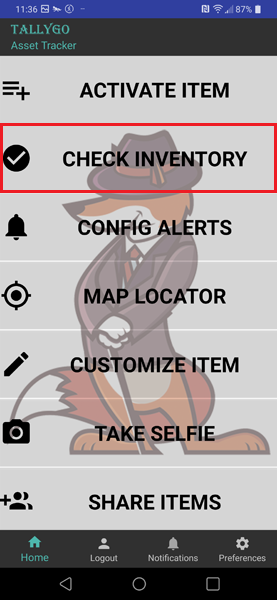
- Select the item you want to ring from the list

- Select RING BEACON AND GEIGER COUNTER

- Select START RINGER
- Beacon will ring for 10 seconds (repeat if necessary)

Simply double click the beacon and it will ring the phone for about twenty seconds. A notification on your phone will appear asking if you would like to stop the ringer. If this does not work then make sure of the following:
- Open Config Alerts menu from the home screen
- Make sure the beacon is configured as Stay Connected
- Make sure Ring Phone is enabled
- Make sure Turn Background Service ON is toggled to ON from the preferences screen (found on the bottom right toolbar)
- FYI, these are all default configurations for most newly activated beacons
If all the above is true then there is probably something wrong with the connection. Go to Check Inventory -> Select the item not working -> Scroll down and select "Debug Connection and Alerts". There you will find clues as to why the beacon is not maintaining a connection to your phone.
The "Stay Connected" option is for items that should never be separated from your phone, such as your key, purse, or wallet. In addition, stay connected beacons can send click and double clicks to the app. This enables the take selfie and find my phone features.
To configure as a Stay Connected item:
- Select CONFIG ALERTS from the Home menu

- Select the item you want to configure from the list

- Select the Stay Connected checkbox
- Select or de-select the appropriate alerts
- Tap SAVE to save your changes

- Note the stay connected icon denoted as two arrows pointing at each other


Things that are often separated from your phone such as a TV Remote or a backpack. It may be advantageous to temporarily set an item you are traveling with as a stay connected item, such as your backpack.
This can happen sometimes when your phone and TallyGo item are separated beyond bluetooth range within your home. You can temporarily turn off alerts by setting up a Trusted Wifi.
To setup a Trusted Wifi:
- Select Preferences from the bottom tool bar

- Scroll down to the "SEPARATION ALERTS" category.
- Toggle Trusted Wifi to the On position.
- Select a trusted home, office, or other Wifi. You need to be connected to the Wifi for it to display in the options dialog.
- Alerts will resume as soon as you are no longer connected to a Trusted Wifi.

TallyGo was designed to use the least amount of battery while still maintaining peak performance. However to tweak it even further you can do 3 things:
- Select Preferences from the bottom tool bar
- Adjust the GPS Settings Accuracy

- Change the Upload Database Interval to fifteen or twenty minutes
- Or toggle Background Service to OFF (WARNING - This turns off all alerts and tracking activity while the app is in the background. This in effect kills the app when you swipe off.)

If you are no longer receiving separation alerts or your phone does not respond to single or double clicks from the TallyGo device it is likely that your device is not connected. We have provided a debug connection module to assist you in fixing the problem.
- Go to CHECK INVENTORY
- Select the item you are having trouble with from the list
- Select DEBUG CONNECTION AND ALERTS

1. First check the "Connection Status". If it is connected and configured as a Stay Connected beacon then you will have a green check mark.
2. Make sure you have allowed the necessary permissions from the "Permissions" category. If some of these items are not checked you may need to go to your phone settings and allow the proper permissions for the TallyGo app.
3. If you are connected and have allowed the proper permissions, check the Status from the "Alerts" category (Perhaps you are currently in a Trusted Wifi) and make sure you have configured the appropriate alerts.
4. Finally check "Preferences" and scroll to the bottom to check your "Sound Settings".

1. If you are not connected and everything else looks good it could be that your TallyGo device is no longer broadcasting.
- A quick test to see if the beacon is powered is by simply clicking the beacon - if it is powered, you should see the led light flash
- A long press of 3 seconds turns the TallyGo device on (make sure Stay Connected option is set before turning on the beacon so TallyGo can maintain the connection)
- A long press of 5 seconds turns the TallyGo device off
- If you hear no beeps and see no led light flashing, it is likely that the battery is dead
- Replace the battery
3. If all fails you can try rebooting or restarting your phone.
3a. For iOS double click the home button and swipe off the TallyGo App.
3b. For Android go to Preferences->menu(upper right)->Restart App.

The device needs to be rebooted. Simply remove the battery and stick it back in. Please refer to the video section to see how to properly remove the battery.
The photos you snap through the TallyGo app are found in your phones photo gallery. For instance on Pixel it can be found in Photos -> Library -> TallyGo. On Samsung Gallery -> Albums -> TallyGo. On iOS Photos -> Library or Albums.
Since bluetooth only allows one connection at a time, then the green checked FOUND status will only apply to whoever happens to be connected at the time. If you would like the green check to apply to both owner and shared at the same time, you will need to configure with the STAY CONNECTED unchecked. For example your TV remote would be something you would want to configure as not stay connected and would be discoverable to all you have shared with.
How To
When your inventory grows it may be convenient to organize it into smaller groups or categories. Even if your are planning a small trip or vacation it would be nice to show only the items you are interested in so you can see immediately which items are near by. To create a custom inventory list or category:


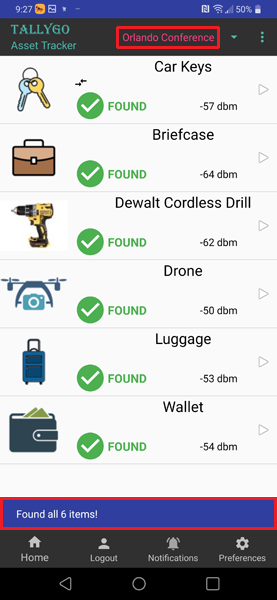
- Select CHECK INVENTORY from the home screen.
- Select Create New Category from the top menu
- Enter a Category Title
- Select the items to include in this list (Auto Select Found will check all items that are currently in bluetooth range)
- Hit Save to save your changes
- Result
Feel free to share your items with as many individuals as you want. When sharing your items with another user, an invitation will be sent to their email prompting them to install the TallyGo app. To share your items with someone else:


- Select SHARE ITEMS from the home screen.
- Enter a name in the Name field
- Enter an email address in the Email field
- Select SHARE ITEMS
- Select the items you want to share with this user
- NOTE: Beacons can only connect to one user at a time. It is usually better to share items that are not stay connected since this allows both users to connect and ring the item while the item is in range. A classic example would be your TV remote.
- You can select Pick Category from the top menu or choose Auto Select Found to assist in item selection
- Hit Save to save your changes
When you delete or remove a TallyGo Tracker it will remove the item from your inventory and allow another user to register the TallyGo Tracker as their own. If you accidentally deleted your TallyGo Tracker just activate again by selecting ACTIVATE ITEM from the Home menu. To delete a TallyGo Tracker:


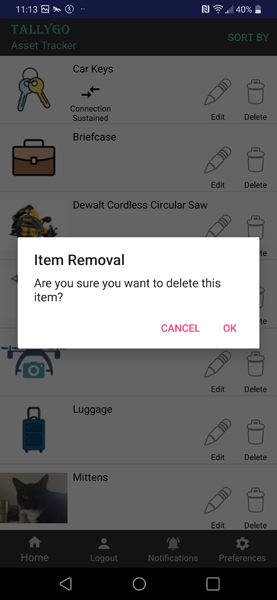
- Select CUSTOMIZE ITEM from the home screen.
- Select the Delete icon from the item you want to remove
- Confirm by selecting OK
- Please see "How do I delete a TallyGo Tracker?"
- After the item is removed the TallyGo Tracker may now be activated by someone else.
When you delete your TallyGo account it will de-activate, remove, and unshare all your TallyGo Trackers. To delete your Account:


- Select Preferences from the bottom toolbar.
- Scroll down to the Account category and select Remove My Account
- Select DELETE MY ACCOUNT
- Confirm by selecting DELETE